Prop List

Published November 13, 2013 by coopersmedia

In order to progress with the making of our music video, there are some props that we need to gather to create the atmophere of our genre.

These props include:

Guitar

Floral Headband

Lanterns

Sparklers

Photos of the artist and her ex boyfriend

Bucket

Beers – Preferably Budweiser because of the authentic looking bottle.

Taylor Swift – Fifteen

Published November 12, 2013 by coopersmedia

We have studied this music video because it has lots of similarities to our own. For example the costume and use of guitar. The artist Taylor Swift also fits our genre of folk/country and is a similar age to our artist. One thing we particularly wanted to look at was they way the artist uses the guitar and the difference this makes to the shots and music video as a whole. In this song, the scenes using the guitar are moments of reflection. This is similar to our video, where the artist is reflecting on her life, then deciding to move on.  Taylor Swift also uses the guitar and the rythmn of the strumming to create an  upbeat feeling at the climax of the song. This is something we think could be used well in our video, as there is a clear build up of emotion through our song, reflected through the beat and rythmn.

Taylor’s use of simple costume in this video, is almost identical to the dress our artist will wear. The simplicity of the costume, and the colour white reflects the innocence of the artist and her natural beauty. simple costume also helps to accentuate the props, instruments and location as it is not too loud and distracting. We hope our similar costume will have the same effect as in Taylor Swift’s video.

We have also taken inspiration from Taylor Swifts make-up in this video as we feel it accurately resembles the folk/country genre and is appropriate for our artist to use. It also keeps within the theme of innocence as it is minimal and portrays the honesty of her character.

Investigating Colour Filters

Published November 12, 2013 by coopersmedia

A technique that we would really like to use in our music video is the use of colour filters, particularly towards the end of our video. We feel that using bright colour filters will reveal the playful and party side of our music video and feel that the different colours could represent different emotions e.g. yellow could symbolise happiness. We have studied some music videos and looked at the way they have incorporated the filters in effectivley.

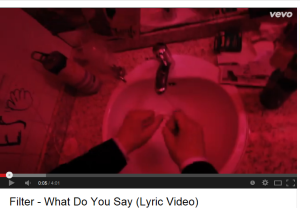
FILTER – WHAT DO YOU SAY

2 1

We feel that the constant pink filter adds to the continuity of the video. We can see how the filter gives a particular effect to the video. For example, this filter gives the video a slightly edgy and rocky feel. We hope that our filters will put across a particular emotion, mainly a playful sense of happiness.

LITTLE MIX – MOVE

Here is a more recent music video that uses colour filters but in a more subtle way. The filter usually focuses on a particular aspect such as the outline of the artists hair as opposed to the whole shot being filtered. Again, this gives a contemporary and edgy feel as it draws the audience’s attention to particular features such as the artist’s face. We hope to make our filters quite subtle and only use them in particular places where we feel it is necessary such as the final chorus and the friends are happy and having fun together and feel a colour filter can help accentuate this.

USING FINAL CUT TO IMPLEMENT COLOUR FILTERS

We have researched into how we can work colour filters within final cut and found these controls which can create different colour filters:

final cut

Here is the link to a website that explains to us how we can do colour filters for our video within final cut. This will be so beneficial to us when editing as we can quickly refer back and remind ourseleves of how to add filters. I personally feel we will use bright colour filters such as blue, red, yellow and green. We intend to experiment with the filters and gain feedback on how effective they are.

http://blog.alex4d.com/2012/03/22/11-colour-fcpx-filters/


Investigating 3 Point Lighting

Published November 5, 2013 by coopersmedia

Upon reflection of our trial lighting shoot last week, we have decided to look further into different lighting possibilites. After researching, we have found that 3 point lighting is a key and somewhat fundemental set up for successful movies. We therefore have decided to use this in our video in order to enhance our artists and deliver the best result.

Investigating Lighting

Published November 2, 2013 by coopersmedia

A main concern of ours regarding our music video was the ability to shoot outside at approximately 5 o’clock, when it is beginning to get dark. At 5 o’clock yesterday when it was beginning to get dark, we took the lighting kit outside and set up two lamps aimed at our artist. Overall we were very pleased with the results and found the lamps enhanced our artist well amongst the dark and their features remained clear which will contribute to the clarity of our video. During our actual shoot, we intend to set up all three lamps and position them around the action in order to give them the most light exposure as possible. Below is a picture of our artist when she had two lamps focused on her, as you can see she remains illuminated and doesn’t fade into the darkness which was an initial concern for us as a group. We also intend to set our SLR camera to slow down the shutter speed whilst increasing grain in order to give us the best possible results.

outside

Filming – Test Run 01/10/13

Published November 2, 2013 by coopersmedia

Yesterday we met up as a group to shoot a test run of a chorus of our video. We felt this would be beneficial to us as we could practice lip syncing and gain an even more visual idea of what our music video could potentially look like. We decided to film the first chorus of our video as it includes only our artist and we did not have our extras available.  In the final video, the artist will sing this chorus outside, however due to weather constraints, we chose to film this inside during our test run as our main focus was on performance and lip syncing. Emily also wore the costume that she will wear for the video and we begun to introduce props such as the guitar. We decided to film the chorus in my living room as it is a fairly neutral room. We relied solely on the lighting kit provided by the school and through experimentation decided that 2 out of the 3 lamps would be sufficient enough for filming inside and we feel this amount of lighting enhanced our artist well. We are currently in the process of editing this chorus and this shall hopefully be up on the blog by the end of the weekend. Overall we are happy with the lip syncing of the chorus and feel that this test run has left us in good steed for filming the final video. Below is a short montage of us during yesterday’s filming process:

This slideshow requires JavaScript.

———————————————————————————————————————–

Research Into Low Light Filming

Published October 24, 2013 by coopersmedia

These are some useful tips that we have found online after recieveing feedback indicating research into lighting options was required. We are definitley going to use some of the tips such as changing the shutter speed and zooming techniques.

1. Add Light If You Can

Even if you’re in a hurry, you can take a few minutes to add more light.

A convenient solution is to use an on camera video light. This is a light you mount to your camera that shines light on the subject. The video light I use is a Micro Pro LED light from Litepanels (highly recommended, by the way).

You have other possible ways to add light too. You can turn on lamps or overhead lights. You can use a reflector panel or a mirror to bounce light into the area that needs more light. Of course, a smart thing is to have a variety of lights that you bring with you. A portable lighting kit is a great investment.

Nothing adds light to a situation like a light.

2. Use the Biggest Aperture Your Video Camera Allows

Sometimes the aperture is called an iris, or f-stop. People use the terms interchangeably.

If your video camera has an f-stop setting, use the lowest number you can. An f-stop of 2 is good. An f-stop of 1.4 is better. The lower the f-stop number, the bigger the aperture. This wide open aperture lets more light into your camera, so you get a brighter image.

If you’re using a video camera that has a zoom lens, be aware that they frequently don’t have a constant aperture as you zoom. As you telephoto (zoom in), many times the aperture will shrink and reduce the light that enters your camera, darkening your image.

The solution is to keep the zoom lens at a wide angle so your aperture can stay wide open. If you need to get closer to your subject, try “zooming with your feet” and walk closer to the subject.

3. Slow Down Your Shutter Speed to Brighten Your Footage

Many video cameras allow you to control the shutter speed. You can use this feature to slow down the shutter speed, meaning that the shutter is “open” longer, which allows more light into the camera.

Normally when I’m shooting video, I use a shutter speed of 1/60th of a second. However, if I’m shooting video in low light,  I might change the shutter speed to 1/30th of a second. This means the shutter is open twice as long, which doubles the amount of light that gets into the video camera. This makes a big impact on the brightness of the video image.

The potential downside of reducing the shutter speed is that you get more motion blur. That can be a legitimate problem, but I find that using a shutter speed of 1/30th of a second works okay for normal human motion.

4. Reduce the Frame Rate in Your Video Camera to Let More Light In

Not all video cameras can do this, but now that many are tapeless, they allow you to adjust the frame rate of your video. In fact, many video cameras try to emulate the look of film by including an option to shoot at 24 frames per second.

In a low light situation, you can change your frame rate to 24 frames per second, instead of using the common rate of 30 frames per second. If you turn off the shutter (or adjust it accordingly), this allows you to capture the frame for 1/24th of a second instead of 1/30th of a second. The slower speed allows more light into the camera, brightening your image. It’s a small increase, but it’s still an increase in light.

If your video camera allows you to adjust the frame rate even lower, you might consider shooting at 12 frames per second, or even 6 frames per second, leaving the shutter off. This wouldn’t work if you’re shooting a talking head or normal human motion, but if you’re shooting video of a landscape, a cityscape, or something that stays fairly still (building, statue, tree), you might want to consider a low frame rate with a slow shutter speed. This will significantly brighten your image.

5. Increase Your Video Camera Gain

Sometimes the video camera gain is called “sensitivity” or “ISO”. It depends on the manufacturer and model.

Only do this as a last resort. Increasing the gain has a bad effect on your image. It adds noise — little dancing flecks (frequently magenta, sometimes blue) in the shadows of your image. This noise is distracting.

Most people think that noise looks bad. You should try to avoid it.

Rule of Thumb: Only increase your video camera gain AFTER you’ve tried the other strategies, because this method does the most damage to your image.

And when you do increase it, try making small adjustments first.

6. Reduce the Video Noise in Post with Filters and Plugins

If you end up increasing your gain, then you’ll likely have unwanted video noise in your footage.

You might be able to repair the footage a little (sometimes a lot) using a filter or a plugin. You can purchase a noise reduction plugin for common editing software like Final Cut Pro or Adobe Premier Pro. When you run this plugin on your footage, you’ll likely see some improvements.

That said, the results won’t be as good as if you had captured noise-free video footage originally.

7. Use a Digital SLR Camera to Shoot Video in Low Light

Currently, a digital SLR camera is a great option for shooting video in low light. In fact, I think they’re amazing in low light. Why do they perform so well?

  • You can use different lenses with wide open apertures.
  • You can control the shutter speed.
  • You can control the frame rate.
  • You can increase the sensitivity a lot more without adding as much noise as regular video cameras.